
One of the most common frustrations while click landscapes is that the DSLR camera is not able to capture the actual colors and the dynamic range (lights and shadows) that we witness with our eyes. While travelling you come across beautiful scenery with bright blue sky and you decide to take out your camera to capture the scenic moment. Only after clicking the photo you realize that the color of the sky captured is not at all blue as it seem, now what?
There are multiple ways to enhance the sky captured in digital format, gladly we are living in the digital age. Adobe Lightroom is one of the softwares which you can use to make the sky perfeclty blue. In this post, we will be looking at three different ways you can use to enhance the sky using Adobe Lightroom.
HSL Settings:
The most time saving and the simplest approach to bring life to the sky in your photo is to use the HSL (Hue, Saturation and Luminance) tab which can be found on the right-hand side panel on selecting the ‘develop’ tab. With just a couple of adjustments you can boost the blue color of the sky, as this approach gives you the freedom to change the hue, saturation and luminance of a particular color by moving the sliders.
Before we proceed, do remember that the HSL settings approach will only be effective if there is some blue color in the sky that you have captured in your photo. Also, this approach will change the hue/saturation/luminance of all the blues present in the photo, be it the sky or the lake/river in your frame.
The photo shown below is a sample image i would be using to explain how you can enhance the blue tone of the sky using the HSL settings approach.

To get started click on the HSL option on the tray, which will then reveal four options for you to choose from: Hue, Saturation, Luminance and All. Select ‘luminance’ and move the blue slider to left (as in this case, we are looking at ways to boost the blue color in the sky) depending on how strong you want the blue color of your to be. One you have adjusted the luminance of blue color, switch to the ‘saturation’ option (this is subjective to the nature of the photo and your personal choice).

Once you have adjusted the luminance of blue color, switch to the ‘saturation’ option (this is subjective to the nature of the photo and your personal choice). In order to increase the saturation of the blue color, move the ‘blue’ slider to the right depending on how much saturation you want to add to the blue color.
That’s it! I have shared the comparison below which shows how the image changes when the luminance and saturation is changed in order to boost the blue color.


As you can easily see the difference created by using the HSL settings approach, the blue sky in the photo looks much more visually appealing as compared to the original photo.
Graduated Filter Tool:
The Gradated Filter tool allows you to select the required part of the photo you wish to apply color correction changes to. Unlike HSL settings, the Graduation Filter tool allows you to partially enhance the colors in the sky by selecting only the desired part of your photo, without making any changes to the part of the photo which has not been selected.
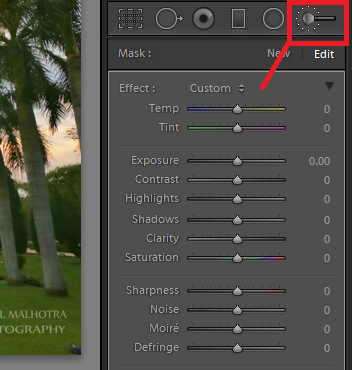
To get started, click on the Graduated Filter icon as shown below, or simply use ‘M’ as a keyboard shortcut.

Once you have selected the Gradual Filter tool, you will see a cross on your monitor as you move the mouse over the photo. With this cross icon, which is a selector tool, you need to click and drag the pointer to adjust the area you require to apply effects to. You will see three lines, this implies that the effect will gradually fade from the first line to the third line. The effect will not apply to the part of the photo which is below the third line. You can re-adjust the slider even after releasing it at a certain point, no worries.

In order to rotate the angle of the Graduated Filter, simply click on any of the three lines and change the angle of the filter as you please. If you wish to move the placement of the slider upwards or downwards, click on the black dot (as shown above) and move your mouse. Once you have decided the angle of the Graduated Filter and the area of the gradual fall, head over to the tool panel on the right-hand side of the screen.

Now you can make the adjustments using the sliders of tools such as exposure, contrast, saturation, etc to enhance the blue tone and color of the sky. I have made the following adjustments to my photo as shown above:
Temprature: -8
Exposure: +0.05
Contrast: +22
Highlights: -17
Clarity: +13
Saturation: +26
Here is the final output i managed to get using the Graduated Filter tool (Before and After comparison):


Adjustment Brush:
Using the Adjustment Brush tool, you can manually select the area in the photo you wish to apply changes to. Unlike HSL setting and Graduated Filter tool approach, the Adjustment Brush tool allows you to click multiple times and select the required area you wish to color correct. This approach is the most time consuming and difficult approach but trust me the result will be worth investing your time for.
To get started, click on the Adjustment Brush tool icon as shown in the image below or simply press ‘K’ on your keyboard. the next step is to select the area you wish to apply changes to, in this case the sky. Click and drag your mouse pointer to whichever portion of the photo you wish to select. Click, release, click, release till you arehappy with the selected part in your photo.
While selecting the sky (in this case), enable the ‘Show Selected Mask Overlay’ option at the bottom of the image (as shown in the image below) to see which part of the photo is getting selecting when you move your mouse, as shown in red color. Use the mouse scroll to increase/decrease the selection size of the Adjustment Brush.

Once you are done selecting the desired portion of the image, simply play with the adjustment tools as in the case of Graduated Filter tool.
NOTE: In order to see the changes being implemented on your photo, uncheck the ‘Show Selected Mask Overlay’ option.
Sharing the final image i managed to color correct using the Adjustment Brush:

Which of these three different ways to boost the blue sky in your photo would you choose?
What’s Trending:
BACK BUTTON FOCUS: HIDDEN FEATURE TO CLICK SHARP PHOTOS
HYPERFOCAL DISTANCE: SECRET TO CLICK SHARP LANDSCAPE PHOTOS