
Understanding how camera metering works and how the different metering modes help you get the correct exposure is really important. If you do not get the exposure correct in-camera, you might end up loosing details while trying to get correct it in post-processing.
What is camera metering and how does it work?
Your camera features a metering sensor which measures the brightness of the subject and tries to properly expose the scene by adjusting shutter speed, aperture, and ISO sensitivity. The frame that is visible through the viewfinder is basically divided into multiple parts, which is then referred to by the camera to pick up the exposure reading basis on the metering mode selected.
Depending on the metering mode you choose, the camera metering sensor would then measure the brightness in that particular area of the frame. Based on the measurement of the brightness, your camera would determine correct exposure values (shutter speed, aperture, and ISO sensitivity) using which you will get correctly exposed photos. This works while you are using the automatic or the scene modes.
When you are using the camera in manual mode, you have the control over the exposure values. But what your camera does is, it suggests you correct exposure for the scene on the exposure scale (as shown in the image below).
If your exposure scale is towards the ‘+’ side of the scale, it means that your image is getting overexposed. Similarly, if the scale is towards the ‘-‘ side, your image is getting underexposed. So if you want to correctly expose as per the metering calculated by your camera, you will have to manually change the exposure values (aperture, shutter speed or ISO) in order to bring the scale to 0.

There are three basic types of metering modes in digital cameras:
- Evaluative Metering (Canon) / Matrix Metering (Nikon)
- Center-weighted Metering
- Spot Metering
Evaluative Metering/Matrix Metering Mode

The majority of digital cameras nowadays are set to use the evaluative/matrix metering mode by default, but it can be changed anytime you wish to. The camera divides the entire frame into multiple segments and analyses the exposure depending upon factors such as the brightness, colors and the distance of subjects in the frame. As the camera analyses the segments in the frame to take an average reading, the segment that has the focus point gets more importance and weightage over other segments.
When to use Evaluative Metering/Matrix Metering Mode
This is the best-suited and safest metering mode if you have just started with photography. Evaluative or Matrix metering mode comes handy when you are outdoors and want to click photos instantly, without experimenting with the metering modes.

You can use this metering mode if you are clicking a scene which is evenly lit, which means that there is a low dynamic range (the difference between the highlights and shadows) as in the image above
Center-weighted Metering Mode

Unlike the Evaluative or Matrix Metering mode, the Center-weighted Metering mode analyses the brightness of light only from the center region of the frame. This metering mode ignores the corners of the frame and focuses only in the middle region which is roughly around 20-25% area of the complete frame. The center-weighted metering mode does not give importance to the focus point, and always evaluates the exposure from the middle area of the frame.
When to use Center-weighted Metering Mode
This metering mode is ideal when you are clicking portraits or headshots as it tells the camera to meter exposure as per the brightness of the face and not the background, provided the model is in the middle of the frame. As in the image below, I framed my scene in such a manner that the subject was placed in the middle of frame so that my camera can take a correct exposure reading.
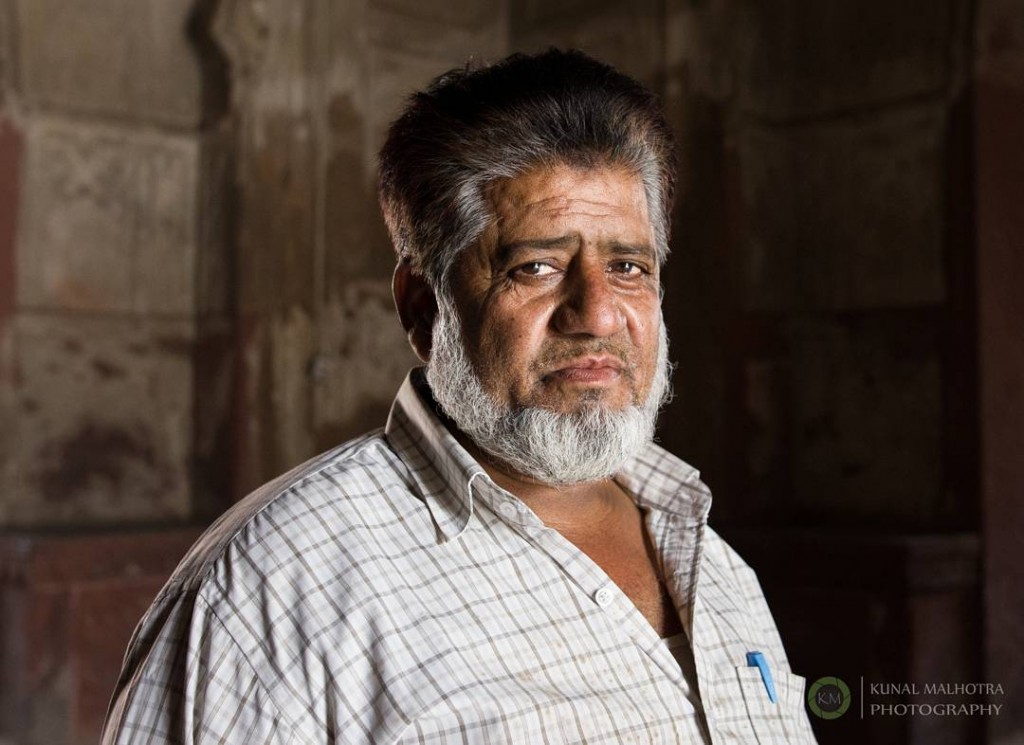
You can also use the center-weighted metering mode while clicking wildlife or flowers, as it will help you get correctly exposed photos as per your subject, and would not consider the brightness in the background which can underexpose/overexpose your photos. So basically if your subject is placed at the center of the frame and covers at least 40-50% area, this is the best-suited metering mode unless the subject itself does not have varying brightness levels.
Spot Metering

The Spot Metering mode in Canon cameras evaluates the brightness of light only from the center focus point of the camera (except for 1D series), whereas in Nikon cameras it uses any focus point that you select. In this metering mode, the camera analyses only 1-4% area around the focus point to pick exposure reading thus giving precise exposure reading of the subject lying in that region.
Canon cameras also offer an additional metering mode which is known as ‘Partial Metering Mode’. it is basically an extended version of the spot metering mode, as it evaluates the exposure by analyzing 5-10% area around the center focus point.
When to use Spot Metering Mode
This metering mode should be used when your subject is small in size and you want to correctly expose it, or if you wish to expose the scene as per the light falling on a specific portion of the frame. For example, you are photographing a wide scene and your subject is relatively small in size.

If you look at the image above, the subject that I want in focus is correctly exposed but some parts of the image are either overexposed or underexposed. This is because I had used spot metering mode and this made my camera take the exposure reading from the center focus point as I was using the Canon 5D Mark iii camera body.
Similarly, in the image below I used the spot metering to ensure that the bird which is appearing really small in the frame is correctly exposed.

How to select the correct metering mode?
After reading about the three basic metering modes a camera offers, you might have got a fair idea about the role of each mode. The Evaluative/Matrix metering mode is ideal in situations when the scene is evenly lit and when there is less contrast in the frame. The Center-weighted metering mode is best suited for situations when your subject is placed in the middle of the frame and covers around 40-50% area of the scene. The Spot metering mode should be used to click a frame that has a relatively smaller subject or if you wish to tell the camera to expose the photo as per a specific part of the scene.
- To click a silhouette, the moon, and macro photography, basically when the subject size is small, use the spot metering mode.
- To click a portrait, headshot, candid shot, basically when the subject is placed in the center, use the center-weighted metering mode.
- To click a scene which does not have varying contrast level, which means that there is less difference between highlights and shadows, use the evaluative/matrix metering mode.
If you still have some questions regarding the metering modes, do comment below. Share this article if you found it informative and useful.
What’s Trending:
HOW TO MAKE CUSTOM BOKEH SHAPES
HOW TO GET CORRECT EXPOSURE USING 18% GRAY CARD
6 SITUATIONS WHEN YOU SHOULD USE MANUAL FOCUS
GETTING STARTED WITH HDR PHOTOGRAPHY
WHY F/22 DOES NOT PRODUCES SHARPEST LANDSCAPE PHOTOS