
The more the pixels in the image, the heavier will be the file size. Considering the market trends, all the camera manufacturers are trying to market their products on the basis of higher megapixel count. Having more pixels is always a good and safe option, as we can always compress or resize the image as per our requirement.
One of the easiest and fastest ways to resize or compress an image is using Adobe Lightroom software. In this post we are going to discuss some of the common situations when you might need to resize or compress images, and how to use Lightroom 5 for the same.
Situations when you need to resize or compress images
While uploading photos on social media:
Do you know, if you upload a 4000x3000px photo on Facebook it is automatically resized to 2048px (width) and the height is proportionately adjusted. Similarly when you upload the same photo on Instagram, you image is resized to 1080px (width) and the height is adjusted according.
While submitting photos for photography competitions:
In majority of photography competitions you are asked to submit photos with file size of under ‘x’ MB, but you realize that the original file is way heavier than required. By compressing the file size, you can make a copy of the original photo and submit it for the competition.
How to resize image using Lightroom 5
Using Lightroom, you can resize a single image as well as multiple images by simply importing files through the ‘Library’ section.
- Right click on the image you wish to resize, mouse-over to ‘Export’ tab and click on ‘Export…’ tab.
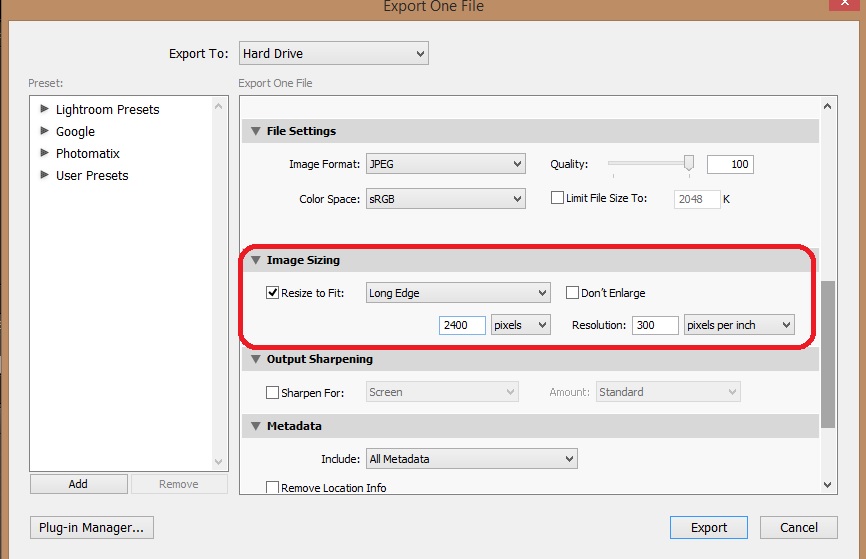
- A new window will open, scroll down and expand the ‘Image Sizing’ tab to gain access to resizing options. (image below)
- Click on ‘Resize to Fit’ check box to further adjust the resizing settings.
- There are five commands that you can select from:
- Width & Height: Let’s you manually select the desired dimensions that you want the image to be exported in.
- Dimensions: Same as the above option.
- Long Edge: You can define the dimension of the longest edge (height or width) and the other would be adjusted proportionately.
- Short Edge: You can define the dimension of the shortest edge (height or width) and the other would be adjusted proportionately.
- Megapixels: You can export the image on the basis of how many megapixels it has once it is exported as a new file.
- Once you are done with selecting desired command, you can also adjust the resolution. Usually, 72 ppi is ideal for image to be viewed on desktop and 300 ppi if you have to get the photo printed.
- Click on ‘Export’ tab at the bottom right corner of the window to save the new image with the selected resizing changes.
How to compress images using Lightroom 5
Using lightroom, you can compress the image by reducing the file size. Following the steps mentioned below, you can learn how to compress images using Lightroom:
- Right click on the image you wish to compress, mouse-over to ‘Export’ tab and click on ‘Export…’ tab.
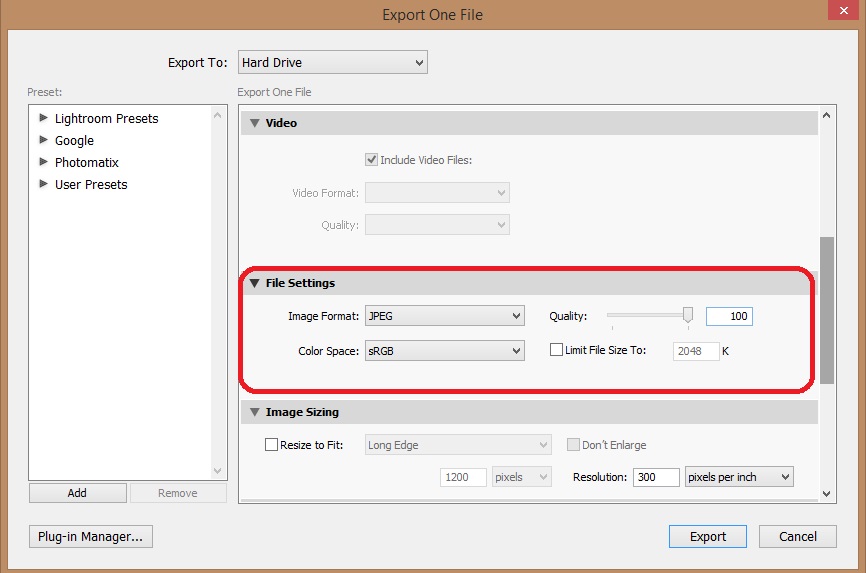
- A new window will open, scroll down and expand the ‘File Settings’ tab to gain access to file compression options. (image below)
- The first thing that you need to choose is the image format out of these five available formats:
- JPEG
- PNG
- TIFF
- DNG
- Original
- Select the desired color space, sRGB is the ideal option.
- If you want to specify the file size, click on the ‘Limit File Size To’ check box and enter the required file size in KBs (1MB = 1024KB).
- Alternatively, you can adjust the ‘Quality’ scale from 0 (smallest file size) to 100 (best file size as per the original file).
- Click on ‘Export’ tab at the bottom right corner of the window to save the new image with the selected compressing changes.
Here is a video explaining the same:
What’s Trending:
5 TIPS FOR LOW-LIGHT PHOTOGRAPHY USING MANUAL MODE ON SMARTPHONE
MOBILE PHOTOGRAPHY – ALL YOU NEED TO KNOW ABOUT MANUAL MODE
UNDERSTANDING CAMERA METERING AND METERING MODES
6 SITUATIONS WHEN YOU SHOULD USE MANUAL FOCUS