Vignetting is an effect which occurs naturally or is purposely achieved in order to draw attention toward the subject in the frame. If you are not familiar with it, vignetting is when the brightness of a photo decreases towards the edges. You will see that the center part of the photo will be the brightest, and as you move towards the edges the brightness keeps on reducing.
To some of you vignetting might look like a useful technique, while for some of you it might be a problem. As the vignetting keeps the center part of the photo bright and the edges dark, it helps to draw viewer’s attention to the subject placed at the center. It can be be used when you are clicking portraits, wildlife or when the subject is positioned in the center of your frame and you want to emphasis on it.
On the other hand, if you are click landscapes, cityscapes, or when your frame is composed in such a way that even the elements placed in the edges as equally important, vignetting can be an issue for you.
Causes of Vignetting
One of the main causes of vignetting is the use of wide aperture opening (low aperture value) such as f/1.4 or f/1.8. Increase the aperture value by 2-3 stops and you will be able to eliminate the vignetting effect. It is more visible in longer focal length, and as you go wider the effect starts getting less visible.
Use of multiple lens filters or mounting low-quality lens filters can result in vignetting, as they can block the amount of light entering from various angles. Even a third-party lens hood can result in vignetting, so make sure you buy the correct hood compatible with your lens to avoid any vignetting in your photos.
How to remove Vignetting using Adobe Lightroom
Adobe Lightroom is one such software which allows you to remove vignetting caused because of one of the ways mentioned above in the post. It is really impressive and the first time I used this feature I was quite impressed with fact that I can get rid of vignetting anytime I wish to in post processing.
NOTE: Before I start describing the process of removing vignetting from a photo, I would like to highlight the fact that you can do this using only a RAW format file.

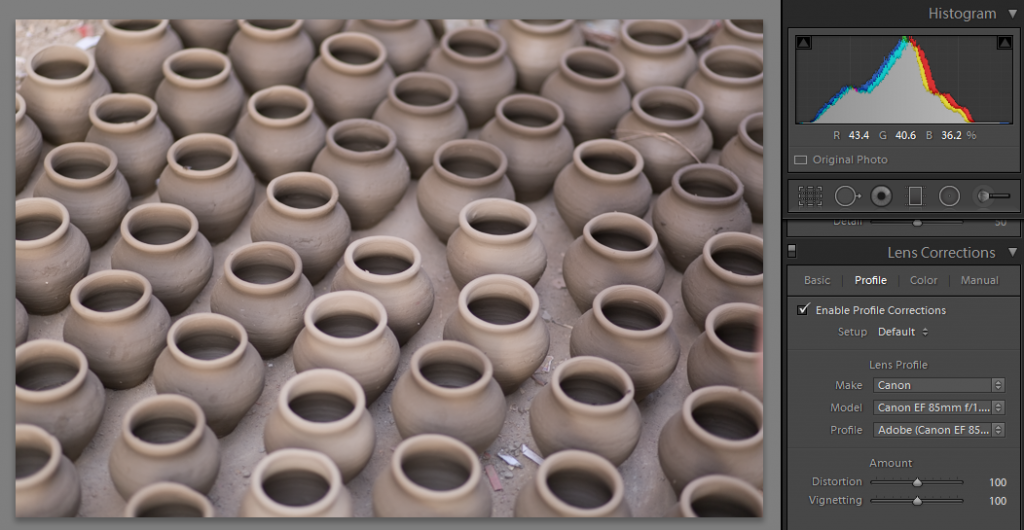
As you can see in the images above, the RAW format file being used was having serious vignetting because the photo was clicked at f/1.8. In the second image the vignetting has been removed using one of the Adobe Lightroom’s feature called Enable Profile Corrections.
What this feature does to your photo is that it automatically detects the lens make, model and profile, if it is available in the database. Lightroom has the lens profiles of almost all the lens manufacturers, except for quite a few such as Samyang. Enable Profile Corrections feature then corrects the vignetting as well as distortion in your photo.
With just a click you can remove vignetting from your photo using Adobe Lightroom, but make sure you are using the RAW format file only as this feature is not applicable on JPEG format file.
In order to access this feature you need to be working in the Develop module and the Enable Profile Corrections checkbox can be found under Lens Corrections tab on the right hand side panel.
How to add Vignetting using Adobe Lightroom
1) Using Post-Crop Vignetting Feature
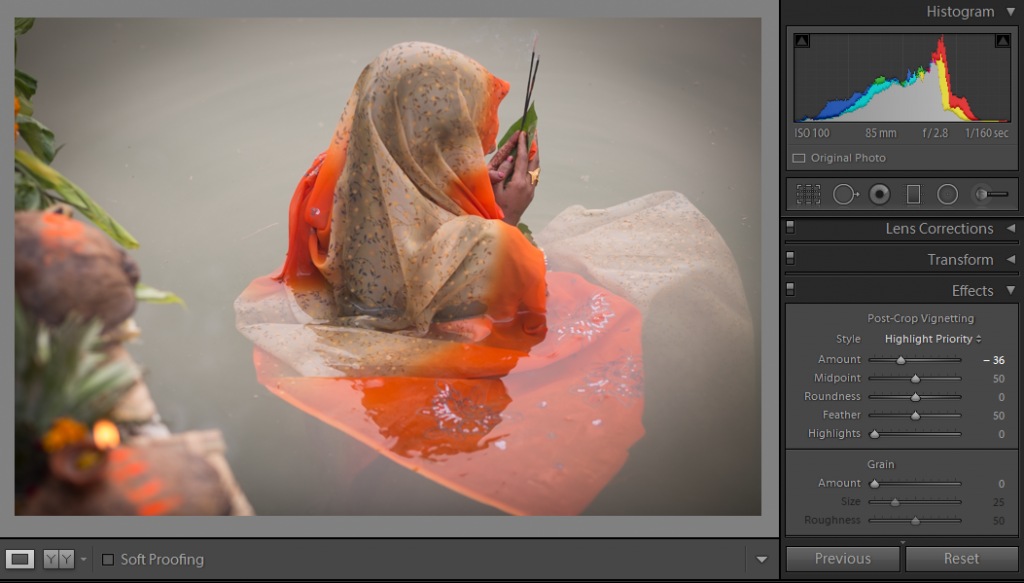
One of the most basic and easy ways of adding vignetting effect is using the Post-Crop Vignetting feature which can be located under the Effects drop-down menu. To keep it simple, you can start with moving the Amount slider towards the left (- number) in order to add vignetting effect. Then you can adjust the Midpoint slider to define the spread of vignetting effect in the photo.
The Roundness slider allows you to define the shape of the vignetting effect, which can be adjusted by moving the slider as per your requirement. Feather slider lets you define the falloff of the effect and it varies from hard to soft depending on where you move the slider. The Highlights slider allows you to retain the highlights from the parts of the photo where you have applied the vignetting effect.
The only limitation in this approach is that you can not adjust the placement of the area where the vignetting effect starts from.
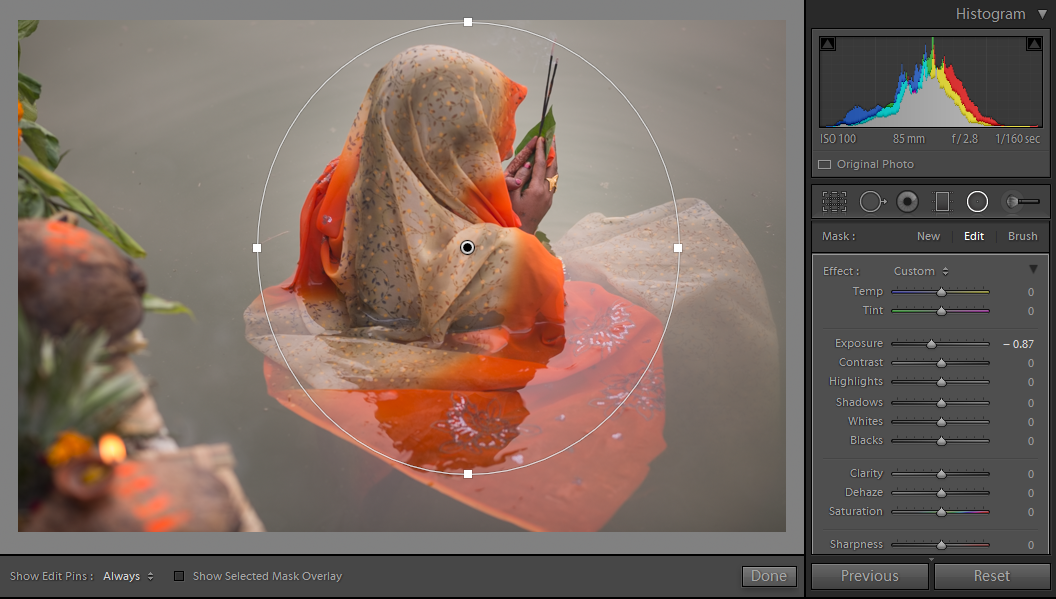
2) Using Radial Filter

The best part about using the radial filter to add vignetting effect is that unlike the post-crop vignetting tool, you can change the position of the area where the vignetting effects get applied. This means that you can select a particular area where the vignetting effect does not get applied, unlike the previous method where it is fixed to the center portion of the photo.
As you can see in the image above, radial filter tool gives you the freedom to play with much more diverse adjustments such as white balance, shadows and clarity. To start with you have to drag and select the area you wish to apply the vignetting effect to, once done then you can get started by adjusting the sliders.
Initially you will have to bring down the exposure to darken the area selected, then you can play with the sliders to get the desired result.
What’s Trending:
HIGH SPEED SYNC FLASH – ALL YOU NEED TO KNOW
WHY YOU SHOULD ALWAYS USE A LENS HOOD
HOW TO ACHIEVE MAXIMUM BACKGROUND BLUR
GETTING STARTED WITH HDR PHOTOGRAPHY
WHY F/22 DOES NOT PRODUCES SHARPEST LANDSCAPE PHOTOS
7 TIPS TO INCREASE SHARPNESS IN YOUR PHOTOGRAPHS
BACK BUTTON FOCUS: HIDDEN FEATURE TO CLICK SHARP PHOTOS
HOW TO GET CORRECT EXPOSURE USING 18% GRAY CARD
6 SITUATIONS WHEN YOU SHOULD USE MANUAL FOCUS